Pages

Monday, January 31, 2011

Martha Stewart Family Tree Knockoff

 KnmoI got my inpiration for this project from the great Martha Stewart herself! In one of her magazines he had a project for a family tree and I immediatly fell in LURVE with it and knew I had to have one!

Unfortunatly, her version of the project was going to run me about $200+, HECK NO! So as I do with most other things I love, I found a way to make it for cheaper, much much cheaper! My family tree is a much smaller scale of her's but we love it! I loved it so much each set of parents one for Christmas and guess what....THEY LOVE IT TOO!

It is such an easy project to make and only takes about an hour. WHOO HOO! Love me some instant gratifaction!

Items Needed:
Card stock or Scrapbook paper - 2 colors. I love the cream linen cardstock!
picture of a tree - google family tree images and you can find a ton that you can borrow!
glue stick
computer & printer
scissors
picture frame


1. Start by finding the tree you want to use. Once you have found and downloaded it, print it off. I made my tree big enough to fit into a 11x14 frame so I had to go to Staples and have it blown up bigger. Only cost $1.00


2. On your computer open Word and type in all the names you are using. Play around with the fonts and sizing untill you get it the right size for your tree. Print on your cardstock.


3. Carefully cut out the names. Cut out of the 2nd color of cardstock the border for the last name, remember this needs to be BIGGER than your last name tag!


4. Glue the last name tag to the border tag.

5. I put all the names in place before I glued them so that I knew exactly where they were going to go first and could move around and make changes if needed. Pick them up one at a time and glue them in place.

6. Insert into frame and stand back and admire your handy work!

I linked up to:
mmm button


Savvy Southern Style

giveaways


mommahenscoop


Happy Crafting
-Jen

Tips & Ideas for a Well Decorated Home

It is no secret that I love to craft and I love to display in my house what I spend my time on, however with as much as I craf,t I am constantly having to circulate stuff through my house for 2 reasons....1. I am not a big fan of clutter. I love order and meaning and love to be surrounded by the things that say something to me. 2. I just craft way too much! If I kept it all up all the time my husband order me to stop crafting immediatley. GACK!
 That  JUST CANT HAPPEN!
  
1. So what I do to keep a tidy yet well decorated house? Keep it simple! I keep most things in their orignial shape so that they can be used in a multitude of different places and I rarely buy something that only has one purpose.
Group items and layer items to maxamize the impact!

Fill vases with fruits and other natural items for an easy, simple
and clean look in your kitchen.


2. I use alot of glass vases and rub on decals. This way I can change out the decals for the seasons and rooms and the glass allows a varity of uses.
Quick and easy rub on decals really dress up some simple and cheap finds!

Simply glass vases double as bathroom storage solutions! And they are NO eyesore!


3. I keep my main colors neutral and add lots of accents. I love that I can change out the smaller stuff like window treatments and pillows and wall art. Our whole house is painted in a very neutral Sherman Williams Wheat color and this allows us to change in and out the other stuff. The only rooms that will be changing colors soon (hopefully) are the kids rooms, but probably nothing to drastic.
 
Blankets and pillows can be changed out seasonally or yearly for a pretty decent price!

 Shelves are great places for vigenetes! I love this toile fabric wreath!

4. Use lots of candles in every room. I love candles and I especially love lit candles on a rainy day. I don't know why but it makes me smile!

5. I love wall art and I am all for signs and pictures but my most favorite decoration of all is family pictures! To me there is no piece of art that can best suite my wall then the pictures of my kids and hubby smiling back at me. (although my hubby doesnt really smile he just kinda does the "man grin"...half smile and half "you have got to be kidding" smirk)
Incorporate your favorite pictures on a vignette for a more personal feel.


6. Use texture! The best way to do this is by using what is around you in nature. Combining wood, wool, leather, cedar, jute and a variety of other materials just screams comfort to me!
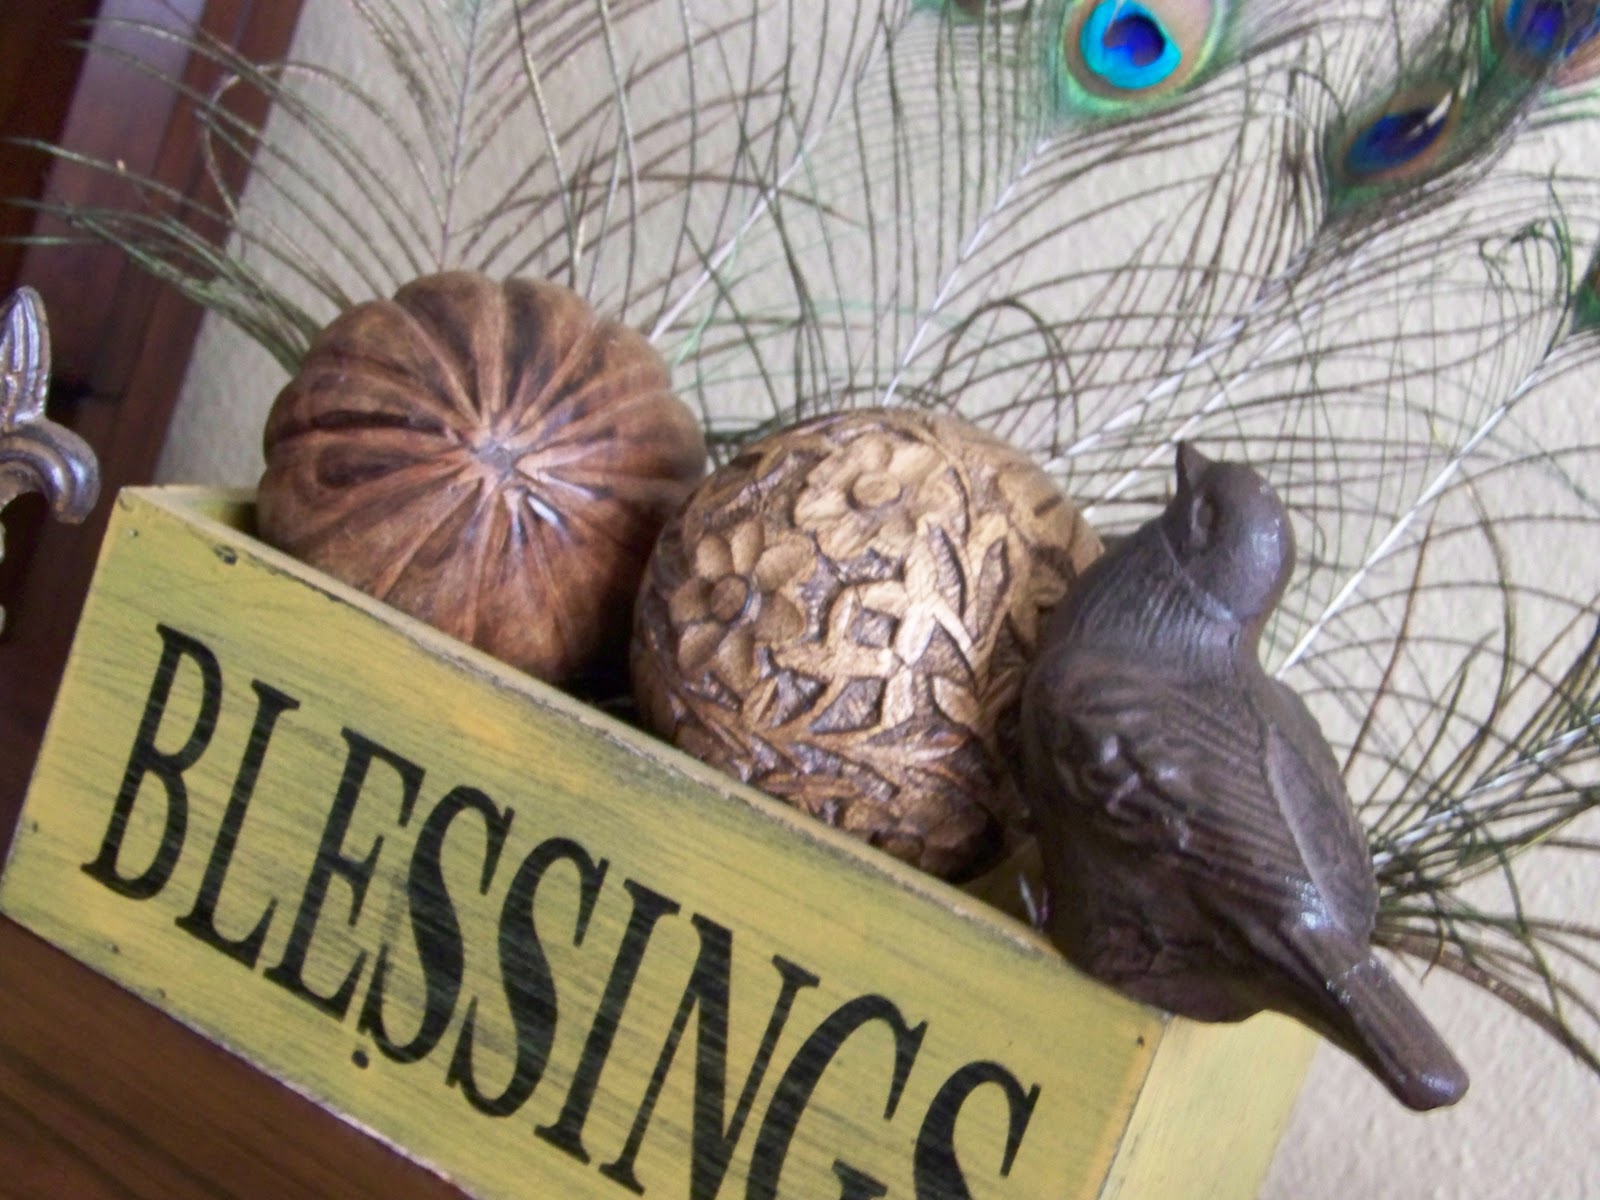
Peacock feather add some fun and funk to your decorating!

Yarn is another really fun texture to work with. Wrap letters or wreaths with it
or put it in a basket in your craft room for all to see!

Nothing makes me feel at home more than an old worn crate
stuffed with warm cozy blankets! The contrast in colors and textures
warms up a quickly!


7. Decorate in unexpected places and with unexpected things! Hang wreaths on interior doors or decal your doors. Number your chairs or put a flower arrangement in a metal can on your staircase. Decorate high and low! Draw your eye up by putting garland or ribbon on your dining room light fixture. Put a small footstool by a bookcase or in your kitchen. Decorating high and low and with unexpected items will draw the eye around your house.
I love to use things from my kids when decorating my home!
Old pairs of boots add character to any space!

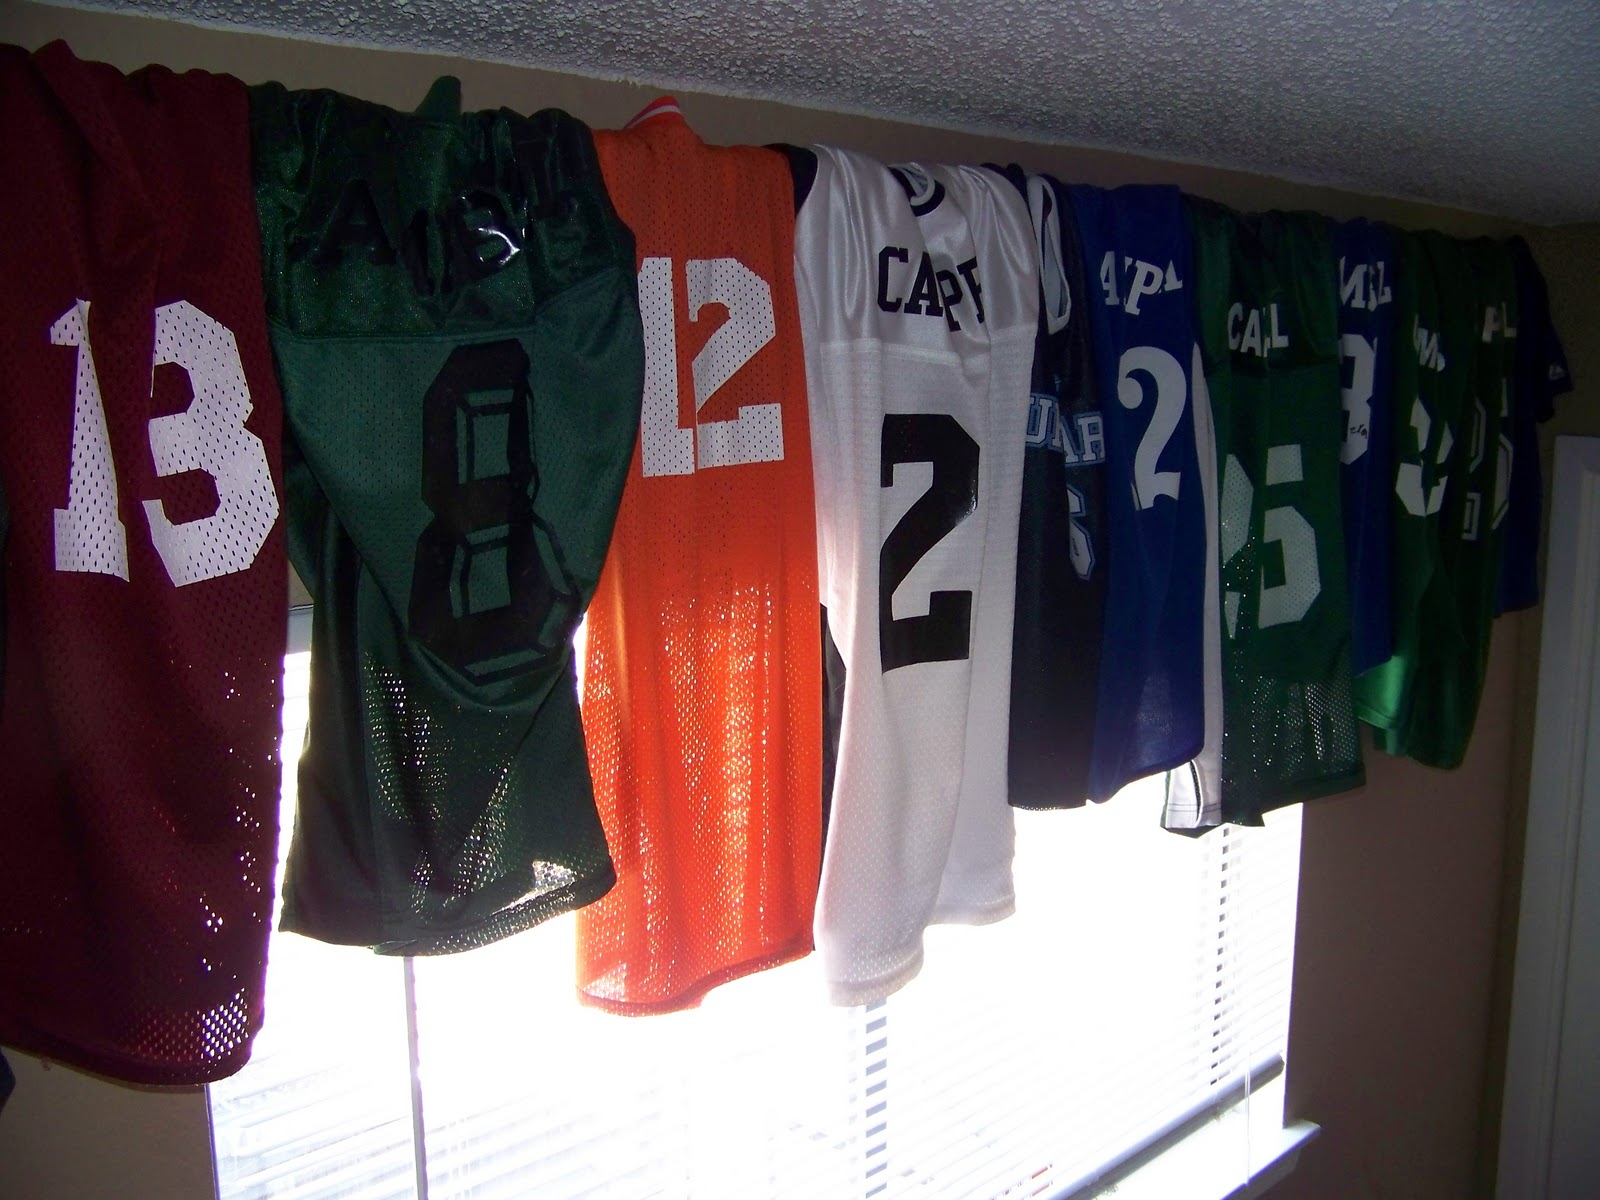
Who says your kids jerseys have to go in the closet? Make them into a window treatment!

Don't forget your doors! Simple decorations for them goes a long way!


8. Dont be ashamed of your last name! Wear it proud and let everyone who comes in know it!
I love monogramning and all things monogrammed!
Martha Stewart Family Tree Knockoff Much cheeeeper and so fun to make!
9. Have fun with your house, there are no real codes anymore! If you don't want your furniture legs on your living room rug then who cares! Just as long as you love it.... that is all that matters!

-Jen

Sunday, January 30, 2011

Weekend Warriors Unarmed

So I had this great idea to start a weekly weekend post called Weekend Warriors, because this is usually the time my hubby and I are knocking out all our DIY projects around the house.
However my idea failed miserably this weekend because my 7 year old is SICK!!! We think he has the flu!
Either way he completely threw a wrench in the whole plan! Instead of being Weekend Warriors we were Weekend Lazy Butts!
Everytime we went outside to start something I got that momma feeling only us moms get when our kids are not ok and came back in to find my kiddo throwing up or coughing uncontrollably. Poor guy!
We live in Texas and have had such crazy weather, when we found out it was going to be in the 70's this weekend we got so excited. Instead we are just watching the beauty pass us by as we are contaminated with germs and desperatly trying to find something on TV to keep us entertained.
And to top it all off..........MY SON HAS ALL THE COMFY BLANKETS HELD HOSTAGE! He is using them ALL in an effort to stay warm (he has on a shirt, sweat pants and socks and literally 3 blankets). Oh well, maybe next weekend we can be Weekend Warriors!
On the plus side I've had time to work on my blog and load some pretty cool stuff on here and also found some really great new blogs! YAY for that! All my favs are under my inspiration, go check them out!
Well friends, until next time!

Happy Crafting!
-Jen

Saturday, January 29, 2011

The Boy's Rooms

I love the kids rooms because there is so much possiblity in there for crafts and fun projects, and they are usually pretty good sports about letting MOM in their room...
My kids are as different as night and day

Chance is a sports fanatic/skateboarder


In our old house I had all their jersey's hanging on the wall above their bunkbeds, but when they got their own rooms in the new house I tried something different....Instead of drapes I used Chance's old sports jersey's for the window treatments. They are hanging on a curtian rod and everything. Every season a new one gets hung up! It spans the entire length of that wall!!


And Robert is a tried & true cowboy who loves baseball


I love his boots! They are so old and worn and just such style to his room!

My next project in their rooms it to make chalkboard walls!!! SO excited for that!

I am linked up to:


-Jen


Wire & Ribbon Monogram

I did this craft several years ago, so there are not beginning and middle photos, just THE END. But it is sooo easy I'm not really sure it needs a tutorial much less pictures. But oh well just in case you have seen it in any of my photos and thought to your self "self, I must make that but dont know how"...now you will!

Items Needed:
Ribbon - I used left over ribbon I had already
Wire Hanger - if your like me and hate them, they come few and far between but I happend to have one in hubby's side of the closet
Time
A neck brace...just kidding although you will get a crick in your neck because it does take some time

1. Start by cutting the neck off your wire hanger and shaping it into the letter or shape that you want. Loop both sides of the wire so that the ribbon wont slide off.

2. Cut small 2" pieces of ribbon, or shirt, whatever material you want to use.

3. Tie the ribbon in knots onto the hanger, make sure you are fitting them snuggly on the wire so that it looks full.

4. Tie a ribbon to the top so that you can hang it on stuff.

Easy Peasy!!

I made one for my parents out of my boys old button up oxford shirts that they had bought them. They always buy them cloths for birthdays and so I thought what a nice sentimental gift! They loved it!


-Jen

My 1st Feature, My 1st Follower

I am so tickled! I have been featured and followed!!! A huge
THANKS YOUR THE BEST to Amy over at Me and My Thrifty Ideas
for my first feature and follower! She has some really great ideas too for craft ideas on a budget!! For all the bloggers out there I hope you remember the feeling you get when someone notices your ideas and loves them too and then passes them on, and I hope that the feeling doesn't go away the more it happens! I started this blog as a way to get my tips and constant ideas out there, so many friends of mine say "share what you have" and I am just so thrilled that I can and that people are listening! What a joyful day!

Happy Crafting

-Jen

Friday, January 28, 2011

Pottery Barn Knockoff

So over the holidays I was helplessly wondering around Pottery Barn thinking wishing praying I could own everything in it, when I stumbled upon the neatest basket of ornaments. They were made out of cardstock, gray back, cream on top with a monogrammed letter in the middle and glitter around the gray border. $2.50 is what they wanted! What a rip!!! So I made myself and for only $1! Yep only a $1.

I wish I had a picture of what it looked like but I didnt have my blog over the holidays so I cant show you, but either way my knockoff came out lookin pretty darn close to the original!

                                          Watch out Pottery Barn here I come!

Items Needed:
2 sheets of cardstock
pretty border making scissors and regular scissors
glue stick
jute - however long or short you want - I use about 6 inches
something to trace circles on cardstock with. I used a small tupperware dish
pencil
single hole puncher


This can be done a couple of different ways, you can either print on the cardstock what you want it to say, numbers, letters, a nice little saying, whatever. If you are printing on the card stock you will need to determine how large you want your middle circle and then configure around that. It can take some time if your a perfectionist like me. Or if you have a one of those nifty crikets/silouettes you can use that and then attach it to the cardstock. Or...see there are so many options...you can use the decals from Hobby Lobby. Whatever you want decide that first!

Now on to the tutorial!

1. Trace your circles on to the cardstock, as you can see I made two the same size...oops 


2. Cut the circles out, the larger one with the pretty border making scissors and the smaller one with regular scissors.
 

3. Glue the smaller circle to the larger circle. This is also where if you did not print on the cardstock you will apply whatever other method of picture you are using. And then punch a hole in the border cardstock.

4. Loop your jute through the hole and tie.

                                     Easy peasy lemon squeezy! And it can go  ANYWHERE!

                                                                       Like here.....


                                                                     Or here...


Or here...


You can put anything on them. I am making numbers 1-4 to attach to our kitchen chairs and the monogrammed on is on my mantel!


Happy Crafting!

Jen

I am linked up at:

Keeping It Simple

giveaways


Related Posts Plugin for WordPress, Blogger...