Pages

Friday, April 29, 2011

Bathroom Update

Man oh man my bathroom update is moving at snail speed! My biggest dilemma here is that, well I have a few dilemmas...1. I have boys (gross) and everything I want to do is either to chic or girly for them and
2. They are at that weird age, not quite teens, but not little. So I am trying to make a masculine kinda grown up bathroom that will work for several years and that is cheap! So far I am failing at cheap...I started with a ship theme, which is pretty cool. Not necessarily nautical or beachy, but very masculine.
You can read this post to see my initial inspiration. Since that post, I was NOT happy with the accessories or shower curtain, so naturally...I changed them. I found some pretty cool stuff that I really like and the boys seem to like it too
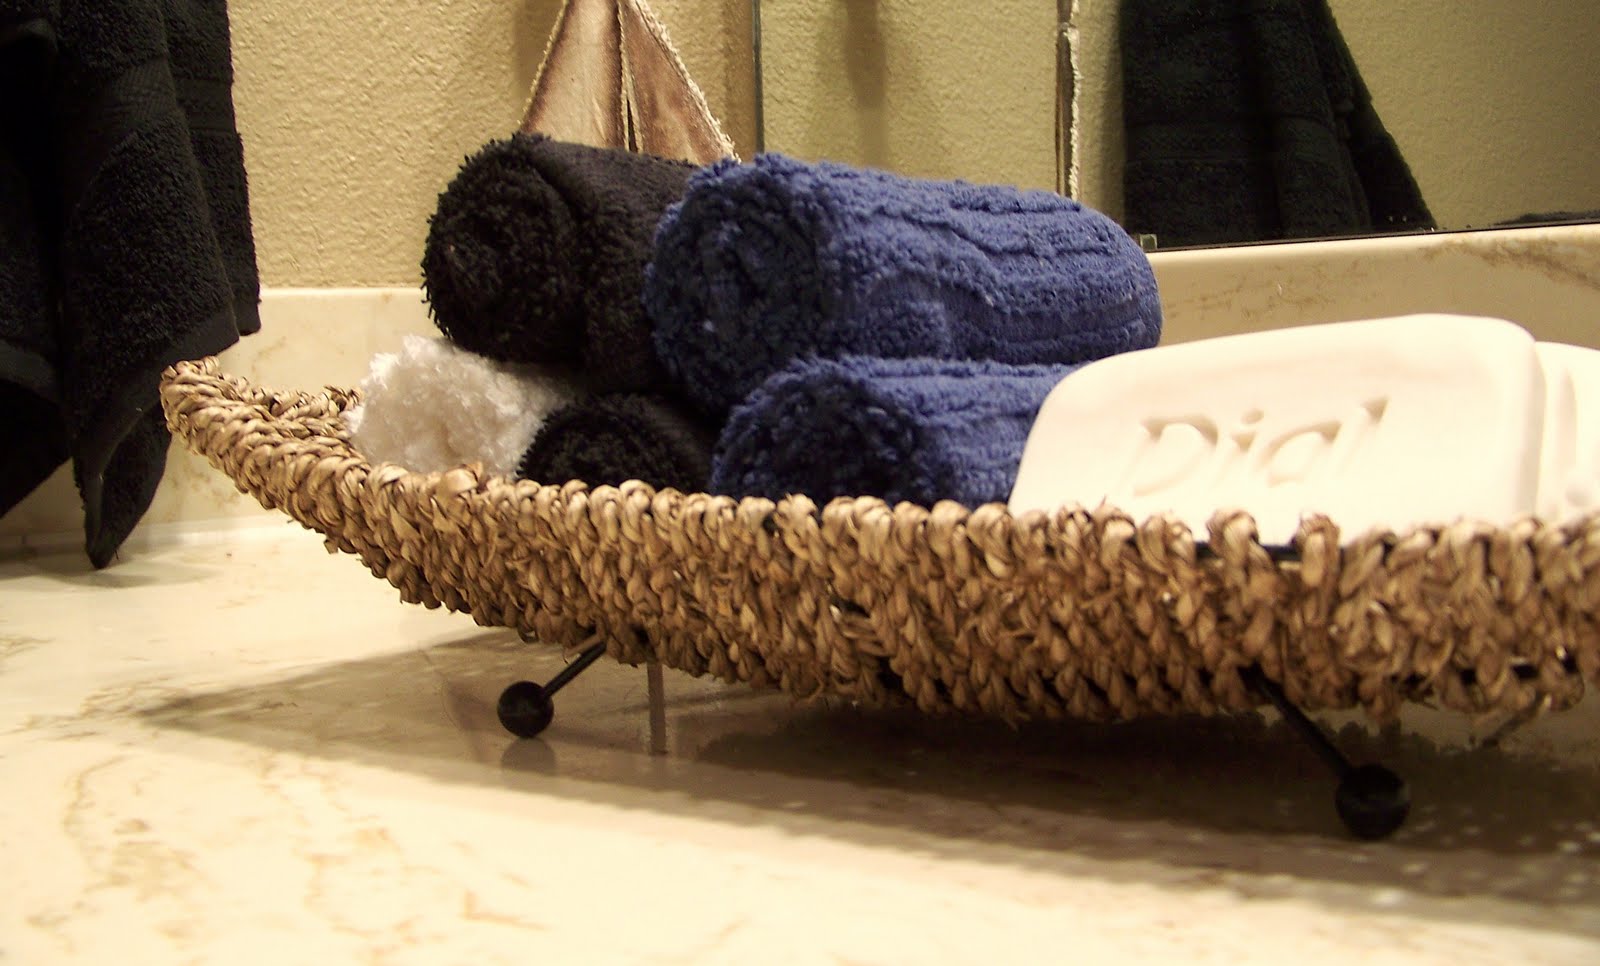
I got the sea grass platter thing at Family Dollar for $3
(yes that is Dial soap...fancy soaps in a boys bathroom just doesn't work..sorry)

I got this sail boat at Hobby Lobby for $5, cant beat half off!
(yes my outlet is missing the cover...that on my list too)

The glass lanterns hanging from the paddle I also got a Family Dollar for $1 each.
I got some in red too for my dining room!

I love the blue, black, and white color scheme. I wasn't sure at first but I really like it.
Question for those moms with boys...I really want to get rid of the bathroom rugs and get some regular rugs, but...my boys NEED the toilet rug there (if your the mom of a boy you get it) what are my options??

I also splurged a whopping $30 for the shower curtain I really wanted at Target. To me it MAKES the bathroom.


We are good with the accessories now, so it's on to the more expensive things like fixtures and lighting and stuff like that. UUUGGG!
But here's my ideas and where I need the help now...I am going to spray paint the door knob, replace the shower curtain rack to match the door knob, take off the toilet paper holder and get a toilet paper stand and I am also thinking about a big frame! I have seen through blogland people hanging frames over the mirror, I love the idea! I don't necessarily want to frame the mirror just yet, because I know that sometime in the near distant future we will be doing a major overhaul in there with the flooring and vanity, so I really don't want to spend much to achieve the "framed mirror look" but I thought if I got a frame big enough that it didn't interfere with the boys actually being able to see, painted it black and hung it on a masculine fabric that would be pretty cool. So what do ya think? It's coming along...slowly. Any ideas, open to inspiration and advise!

Jen

Thursday, April 28, 2011

How Often Do You Clean It...Under the Couch Cushions

Yep, that's right...that oh so neglected place that we almost always NEVER clean until one of the kids looses a toy or sock or the remote control disappears...and we apprehensively lift the couch cushion for fear of what it may look like under there.
 How often do we really think lets clean UNDER the couch cushions. This is one of the mysterious places that logically shouldn't get dirty but does. Every time I lift the cushions I am always amazed at the stuff that is under them, how exactly does a sock get smack dab in the middle of the underside of the cushion???
 Either way, it does get dirty and depending on your families habits, # of kids and animals, what you find will vary. Mine mostly gets dirty with dog hair and the occasional bakugan or silly band. We don't eat in the living room so thankfully I don't have to worry about anything more than an extra pet growing under there.
 I really don't think about this area often, usually once or twice a year. So here I go, for all my friends who know me personally and see my house spic and span I am afraid I may crush your expectations, 
I am revealing the ugly truth of what my couch beholds...

I really don't know what that is or how it got there...
Now time to whip out the trusty vacuum, I only use my attachments for the corners and sides, other than that I just vacuum the couch like I would the carpet. The vibrations loosen all the dirt, bouncing it around and allowing it to vac up easier (that what I tell myself at least), and then I do the same for the cushions.

And 10 minutes later...


Now it's ready for me again!

And of coarse you know I'm gonna ask...HOW OFTEN DO YOU CLEAN...UNDER YOUR COUCH CUSHIONS??? Any tips or tricks???

Jen

Wednesday, April 27, 2011

DIY Flower Broches/Hair Clips

Happy Wednesday! I hope that every one had an amazing Easter weekend with your family, I know we did. Keeping with Campbell tradition we got up, worshiped our AWESOME Lord then went to my MIL's house for lunch and Easter egg hunt. We keep thinking that all the kids are getting to old, but they love it and my husband, brother and myself always have fun hiding the eggs.

So now that its all over and we are holiday free for a small bit I got a fun little project done!
As much as I did NOT want to jump on the flower/bow thingy in the hair band wagon I have!
I scored two really great items at Sam Moon (the most amazing store EVER!) for a buck each and LOOOOOVEEE them.
My hair is finally long enough to wear in a lower side ponytail and I clip these pretty little things in!
What I love about these is that they have three different ways you can attach them.
Rubber band, Clip or Pin for your shirt! 
Cute!
So....that inspired me to make some of my own. I grabbed a sheer top I never wear anymore, some extra buttons I had lying around and some fabric I had bought to make a rag wreath....(never got around to that...) and got to crafting.
I started by cutting out two different size circles from the sheer top.
Then I applied a dab of hot glue to the middle of the small circle and bunched it up in the middle, I was going for a ruffled look.
I then applied a small dab of hot glue to the bigger circle and pressed it on to the smaller circle. 
I applied small amounts of hot glue around the circles, bunching and attaching in random places until I got the look I wanted.
And of coarse last but not least I glued the button on top. 

For the next one I followed the same steps as above, except I used three circles all different sizes!
 Easy peasy!!! I mean really, the biggest pain of this was burning myself on the glue!
And now I have two cute flower things I can attached to my tops with a safety pin!


What do you think?? I know what my new craft hobby is now!
Give it a try and link back so I can see what you made!

Jen 

Linked to:


mommahenscoop
Photobucket


The Trendy Treehouse

Monday, April 25, 2011

Monday Musings


Robert: I have never seen a squishy rock before...
Dad: Give me that...that's a jelly bean goof!
Robert: How do you know, it looks like a rock, it's black.
Dad: Because when I squished it I could see the sugar inside.

Jen

Friday, April 22, 2011

Outside Before and After & What We Have Been Up To

When we moved into this house it was pretty barren. The owners had planted monkey grass randomly through out the yard in hopes it would take over and look like grass. It did not work. There are 35 trees on our property, which makes both spring and fall a nightmare. In the spring the oak trees drop thousands probably millions of these yellow seed things that stick EVERYWHERE, and of coarse the fall brings us 125 bags of leaves. As first time homeowners we are crazy about our yard, and obviously my OCD carries outside too. I do all the yard work, I am so precise about my yard my neighbors laugh. Oh well, look at mine and look at theirs...just sayin.
 I am so proud that after just 1 year our yard went from this...

to this...
Amazing huh?!

We have been working really hard in the yard this year.
I like to start every Spring with some new hanging plants. Last year I had all flowers, so this year I decided to go with some ferns and flowers. I really like it!

We put in some path lights to guide the way to the door at night. So Cool! They are solar, which is good and bad. On sunny days they will stay lite all night long, but on cloudy days like today they will only make it till 2 or 3am...oh well no one is coming over or leaving at that hour anyway.
We gave a good scrub to our patio furniture, it was NASTY! This year I am going to get some outdoor pillows and hopefully an ottoman too!

On the other side of the yard, we cut down some trees. I wish I could find a before picture of this, these trees being gone opens up the space so much! And yay that should be 20 bags less I have to rake this fall!

We still need to clean up the excess growth on the trees this weekend, they are looking a bit furry! And once those stupid seed things stop falling I will clean the flower beds and replace the mulch. I always to red mulch, I guess because our front door is red, I like the extra pop the red mulch gives.
So that is that, the front of our house! Big changes from a year ago.
What do you think? Any additions that would spruce it up more?

Jen

Thursday, April 21, 2011

How Often Do You Clean It...Kitchen Light


Welcome to another edition of How Often Do You Clean It! If you have been following along your house should be getting squeeky clean, and if you haven't click here to check out the different places we have been cleaning!

Today's post was a complete accident, what I mean is...what I was going t
o post about has been postponed due to rain so I was racking my brain trying to come up with something on the fly when in my kitchen door (that was wide open as a bribe to get my dog outside) flew a moth. That little moth (actually he was pretty big and gross) flew right up to my florescent kitchen light. I know you are all gasping because I still use florescent fixtures, yes bad me, but I really like it and the casing is custom made by my husband so it's not your typical ugly florescent light. Anyway, I looked up for the first time in a long time, I mean really who looks up into florescent lights when they are ON??!!! When I got the cover down I was surprised, there were dead bugs as expected, but there were only 10 or so and they were tiny nat looking things. I was expecting lots more and bigger too. I guess the light multiplies and grows them a bit... Completely haphazard that I discovered this but so glad I did, now it's all clean! 5 minutes is all today's cleaning project took!
This is what was up there

So now I ask, as I always do....How Often Do You Clean...Your kitchen light fixture? Do you have the oh so undesirable florescent light fixture in your kitchen and it is covered in bugs too? Please someone tell me you so that I am not the only one!

Jen

I'M BACCCKKK and Donald Trump for President

Hey ya'll! So sorry for the 2 week hiatus, it has been CRAZY busy here in the Campbell house.
 I posted a few weeks ago about baseball taking over our lives and I kid you not it is overwhelming but sooo much fun! My oldest son who plays catcher (and is darn good at it) got a compliment from the other team after the game on Tuesday. Thrilling!
Not only have we been consumed with baseball at every turn but there are insane wildfires here and it burned down the deer lease we are on! My husband went down there last night, after 2 weeks they finally opened up the roads, out of 1,000 acres and 12 deer stands, 800 acres were burned and 4 deer stands made it out untouched...OURS was one of the 4! As soon as we found out the fire was moving in that direction we began praying fervently, when he arrived last night to the lease he found that the fire had come within 2 feet of our camper and burned all around his stand and up to the legs of the deer feeder, but our belongings were untouched!
No one can say prayer is not powerful, God reached his hand down and placed it over our stuff protecting it.
We have had hospital visits, and yard work, tree cutting and yard mowing. All keeping me away from this oh so fun hobby I have began! But I am back!!! School is almost over for the kids, spring clean up of the yard has been done and baseball, well that is no where near done but I think life it on it's downward slope to not so busy.

I have lots of great stuff in store, new How Often Do You Clean It ideas, new makeup reviews, and a few new crafts I will be posting soon! So hang in there with me, we'll be back on the ball before you know it!

Now on to more interesting things....Donald Trump for President??? I know he hasn't officially announced his intention to run, but come on...I'm pretty sure he is. I have been watching him on the Today show and I have to say, if he runs I am SO voting for him! What do you think? Have ya'll seen him talking about it? What are your thoughts, do you think he is just the right man to get our country on the right track at last??? I am so intrigued by this!

Jen

Monday, April 18, 2011

Monday Musings


Robert to Chance: What's your favorite color?
Chance: Camo
Robert: Camo is NOT a color!
Chance: Yes it is! They have camo duck tape, that makes it a color!
Robert: Camo is like a polkadot. It's not a color.

Monday, April 11, 2011

Monday Musings


I love to talk to my 7 year old, we have such thought provoking conversations.

Robert: Mom...can you put socks on backwards?
Me: Um...no.
Robert: Well then my feet are on the wrong way.
Me: HAHAHAHHHHHAAH. Silly.

Jen

Guest Posting at Bella Before and After

Hey OCD friends, today I am hanging out with my friend Bella at
come check me out there and and hang with me for awhile. You will not be disappointed! She's got such a fun blog full of bloggin goodness and over the next few weeks there will be tons of guest bloggers, so you may even find some new blogs to follow!
See ya'll over there!

Jen

Friday, April 8, 2011

Spring Pennant Centerpiece

I saw this project while perusing Embellishing Life and HAD to copy it! Thanks Embellishing Life!
Her's was a fall themed centerpiece so cute CLICK HERE to check it out!
Because I just recently found it I decided I wanted to make my pennants with bright springy scrapbook paper that can work around my house for the next few months. On a mission I went to Hobby Lobby and found some really great paper (I am never on a mission when I go there but I have to say I was so excited to make these puppies I was in and out in record time)!

Here's how I made my pennants and what I used:
5 different scrapbook papers
twine
hole puncher
dowles (whatever size you want)
glue stick
scissors

I started by making a pennant stencil.

Fold each paper in half and lay your stencil on the folded edge, trace and cut.
Doing it this way allows you to have color paper on both sides.

Glue paper together, hole punch, and then tie your pennant to the stick with the twine.

This project seriously took me 20 minutes.
The longest part was tying them to the sticks.

Then put them in whatever container you want! I currently have them in tarnished silver goblets full of sand on my mantle. The sand keeps them in place. I have even thought about for Easter, getting the fake grass we put in our kids baskets and filling up a vase with it and putting them in there for the centerpiece.
Possibillities are endless!

What do you think? Jelly beans maybe or shells?

Jen

Linked up at


monogram


Thursday, April 7, 2011

No How Often Do You Today

I am so sorry friends, I know you eagerly await Thursday for one reason,
 hits the blog...(just kidding I am not that full of my self...) really though, I am going to have to skip this week I hope ya'll understand...while my son was catching at his baseball game last night he was hit by the batter with the bat. The batter hit a ball so hard it went to the fence, when he hit the ball he let the bat fly back FULL SWING AND REALLY HARD and it his my son in the shoulder. He immediatly hit the ground twitching and crying, was rushed to the ER for a possible dislocated arm or torn ACL. After several hours and scares they thought his growth plate was fractured, so they put him through more xrays and determined there was no frature, just severe bone and muscle brusing. THANK GOODNESS! After 5 hours in the ER, and 1 slinged arm later we were home.
So today I am taking the day to baby my baby. Check back next Thursday for the oh so exciting post on WINDOWS!!! Pictures will be complete with dirt, hard work and squeaky clean windows.

Jen

Wednesday, April 6, 2011

My Gallery Wall

I know several years ago cross walls and by complete accident we hopped on the band wagon. Over the years our wall has grown mighty large with crosses from all over and of all textures. So you can call me old school or dated or even out of fashion but I love our gallery cross wall. It is in our formal dining (which is not really formal but pretty relaxed with peacock feathers, burlap and tarnished silver goblets) on the wall that you see as soon as you enter the house. I am so proud of our collection of thoughtfully aquired crosses I want it to be one of the first things noticed. 

So here you go, my version of a gallery wall! 


Jen

Linked to:
Organize and Decorate Everything


Tuesday, April 5, 2011

How Often Do You Clean It was featured!

A huge THANK YOU to Holly at 504 for spotlighting my
504 Main
You have got to go check out her blog, she is funny and witty and has GREAT ideas, and not to mention her Tickled Pink Friday Party is rockin!

Jen

Wrong way spray painting the Right way

I am a self proclaimed lazy spray painter. There is just no other way around it. I want the quickest way to the final product and that does NOT include primer and waiting for each coat to dry. I know one day this is going to bite me in the butt, but for these projects it worked in my favor.

All I had to do in both projects was:
1. Grab my trusty can of Valspar spray paint.
 2. Apply 4 coats of spray paint, waiting 5 minutes or less in between coats. 
3. Wait 1 hour after the final application.
4. And sand to achieve desired effect, while not panicking.

The first of these projects I did this way was the candle sticks, and I have to admit when I started sanding and the spray paint started stripping off as heavy as it did, I was worried I had severely messed up my candle sticks. But the final product, which was to look like the PB candle sticks, was better than I anticipated. I have gotten tons of compliments on them and I really like them so I count it a success! 

When I attacked the bird house I did it the same way. The only difference was I lightly sanded the bird house first, which helped the spray paint to adhere a bit better. Still though I did not use primer and did not wait in between coats for the paint to dry. To me it looks great too! And again tons of compliments, so score #2 for spray painting the wrong way!

 
Obviously there are times when this "look" is not what your going after and primer is a must but I really like the look these two projects have. So there you have it, spray painting the wrong way can sometimes be the right way to do it!
 Let me know if you try your hand at this or if you have, did you like what it turned out like?

Jen
Related Posts Plugin for WordPress, Blogger...